How to Install Wood Look Floor Tiles Like a Pro?

Time:2026-05-07 Author:Sienna
0%

Installing wood-look floor tiles can transform a space, offering the beauty of hardwood with enhanced durability. Industry reports show that sales of wood-look tiles have grown by over 30% in recent years. This trend highlights the demand for aesthetically pleasing, yet practical flooring solutions. According to flooring expert, John Smith, “Proper installation of wood-look floor tiles can significantly impact their longevity and appearance.”

Understanding how to install wood-look floor tiles properly is crucial to achieving the desired results. Many homeowners attempt this project without appropriate guidance, leading to common pitfalls. An expert strategy can make a tangible difference in the outcome. Reports indicate that over 70% of poorly installed tiles require reinstallation or repairs. This statistic emphasizes the need for reliable information and professional techniques.

As you embark on the journey of installation, it's essential to recognize the importance of preparation and precision. The process may seem straightforward, yet many overlook fundamental steps that can lead to dissatisfaction. Embracing these details can elevate your project from mediocre to magnificent.

How to Install Wood Look Floor Tiles Like a Pro?

Understanding Wood Look Floor Tiles: Benefits and Varieties

Wood look floor tiles offer a beautiful aesthetic reminiscent of natural wood. They provide the rustic charm of hardwoods without the maintenance complexities. According to industry reports, 12% of homeowners prefer wood look tiles for their durability and affordability. Unlike real wood, these tiles resist scratches and moisture, making them ideal for kitchens and bathrooms.

When choosing between varieties, consider the finish and texture. Matte tiles often hide dirt better, while glossy finishes can brighten up a space. There are plank styles that mimic longboards, and square tiles that offer a modern twist. Each option provides flexibility to match your decor.

Tip: Before installation, let tiles acclimate in the room for at least 48 hours. This helps prevent expansion and contraction. Always measure your space accurately to avoid mistakes. If you mix different shades of tiles, it adds depth, but ensure they harmonize. Pay close attention to grout lines, as uneven spacing can be visually distracting.

Preparing the Subfloor: Essential Steps for a Solid Foundation

Preparing the subfloor is crucial for installing wood-look floor tiles. A solid foundation ensures your tiles will last and look great. Begin by clearing the area of dust, debris, and any old flooring materials. Uneven surfaces can lead to problems later. Make it a point to check the moisture level in the subfloor; too much moisture can ruin your installation.

After clearing the area, inspect the subfloor for cracks or holes. Filling these gaps with a suitable patching compound can create a smoother surface. If you're working with plywood or concrete, ensure they are in good condition. Failing to address these details can lead to unexpected squeaks or damage. Remember that a level surface is essential; use a leveling compound if necessary. Sometimes, it may feel like you’re over-preparing, but this step is the backbone of your project. Taking the time here saves headaches down the line.

Finally, always allow the subfloor to cure properly if you’re using any adhesives. Improper curing can affect the adhesion of your tiles. This step might feel tedious, but a little patience goes a long way. Even small errors in the preparation can lead to larger issues later on. Ensure you have a reliable foundation before moving ahead with your tile installation.

Tools and Materials Required for Installing Wood Look Floor Tiles

Installing wood look floor tiles can elevate your space dramatically. To begin, you'll need specific tools and materials for a successful installation. Standard tools include a tile cutter, trowel, and spacers. A level is essential to ensure your tiles lay flat. A rubber mallet can help you tap tiles into place without damaging them. You can also use a measuring tape and chalk line for precise layout.

Materials are equally important. High-quality wood look tiles typically come in ceramic or porcelain. Adhesive is needed for secure bonding; thin-set mortar is a popular choice. It’s advisable to invest in a good grout for lasting results. The National Tile Contractors Association reports that proper grout can improve the longevity of your floor, resisting stains and wear. Remember to let your tiles acclimate to the room temperature for at least 48 hours. This practice helps reduce expansion and contraction issues later.

Despite the initial preparation, mistakes can happen. Misaligned tiles can lead to an unprofessional appearance. Uneven surfaces may require more adhesive or might necessitate stripping back the initial layers. It's crucial to remain patient and attentive throughout the installation. Learning from these mishaps can enhance your skills for future projects.

Tools and Materials Required for Installing Wood Look Floor Tiles

Step-By-Step Installation Process: Techniques for Precision and Quality

Installing wood look floor tiles can be a rewarding project. Start by gathering necessary tools like a tile cutter, trowel, and spacers. Begin with a clean and dry subfloor to ensure proper adhesion. Lay out the tiles in a dry run, checking alignment and making adjustments if needed. This step is crucial for visual appeal and accuracy.

When applying adhesive, use a notched trowel for even distribution. Press each tile firmly and use spacers to maintain consistent gaps. Don’t rush this process; perfection takes time. As you progress, periodically check for levelness. An uneven floor can lead to long-term issues.

Grouting comes next. Choose a color that complements the tiles. Make sure to wipe off excess grout quickly. Once the grout is dry, seal the tiles for durability. Remember, this is detailed work. Mistakes can happen, and it's okay to backtrack as needed. Fine-tuning your approach will lead to a polished final look.

Post-Installation Care: Maintaining Your Wood Look Floor Tiles

Wood look floor tiles can elevate your home’s aesthetic. However, maintaining their beauty requires diligence. Data from the National Tile Contractors Association reveals that nearly 80% of tile damage results from improper care. Thus, understanding how to properly maintain your tiles is crucial.

Regular cleaning is essential. Use a soft broom or a vacuum with a hard floor attachment. This prevents dirt buildup. A damp mop with a gentle tile cleaner is also recommended. Avoid harsh chemicals; they can dull the finish over time. Stay away from steam mops, too. High heat can warp the tiles.

After installation, allow the grout to cure fully. Typically, this takes about 72 hours. Once set, apply a grout sealer. This step is often overlooked but vital. Sealing helps protect against stains and moisture. It's worth noting that unsealed grout can absorb spills, leading to discoloration. Inspect your tiles regularly for chips or scratches. Addressing these issues quickly can prevent major repairs.

FAQS

: What tools do I need for installing wood look floor tiles?

: You will need a tile cutter, trowel, spacers, level, and rubber mallet.

How should I prepare the floor before installation?

Ensure the subfloor is clean and dry to aid adhesion.

How can I check tile alignment before final placement?

Perform a dry run with the tiles laid out for adjustments and alignment checks.

What type of adhesive should I use?

A thin-set mortar is a popular choice for securing the tiles effectively.

How can I maintain even spacing between tiles?

Use spacers to keep consistent gaps between each tile during installation.

What should I do if I notice misaligned tiles?

Don’t hesitate to adjust them; mistakes can be corrected during installation.

How important is grout color for the final look?

Choose a grout color that complements your tiles for the best aesthetic.

What should I do before grouting the tiles?

Wipe off excess adhesive and make sure tiles are properly positioned.

How long should I allow tiles to acclimate?

Let the tiles acclimate to the room temperature for at least 48 hours before installation.

Is it okay to make adjustments during the installation?

Yes, don’t rush; take your time to ensure quality and precision in your work.

Conclusion

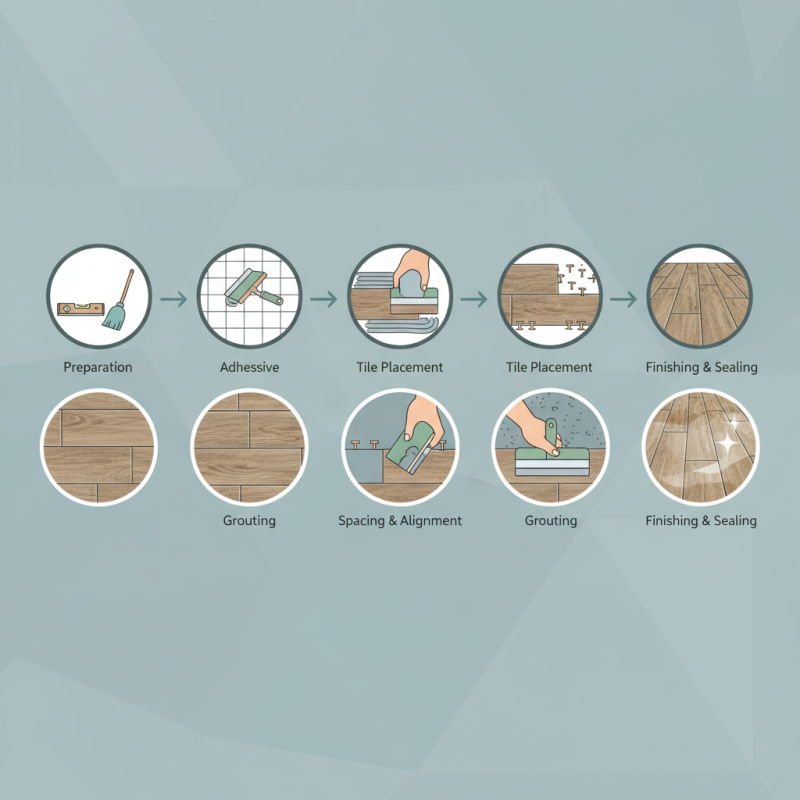
Installing wood-look floor tiles can transform the aesthetic of your space while providing the durability of tile. To get started, it's crucial to understand the benefits and varieties of wood-look tiles, which combine the beauty of wood with the practicality of tile. Essential steps include preparing the subfloor to ensure a solid foundation, which is vital for long-lasting results.

When considering how to install wood-look floor tiles, gather the necessary tools and materials beforehand. The installation process involves a step-by-step technique that emphasizes precision and quality to achieve a professional finish. Finally, maintaining your wood-look floor tiles post-installation is key to preserving their appearance and longevity, ensuring your investment remains appealing for years to come. Follow these guidelines for a successful installation and enjoy the charm of wood in your home.

Sienna

Sienna

Sienna is a skilled marketing professional with a deep expertise in our company’s core products and services. With a passion for innovation and detail, she plays a pivotal role in crafting insightful blog posts that not only highlight the unique features of our offerings but also provide valuable......